How to implement asynchronous communication between microservices using Spring Cloud Stream
Spring Cloud Stream is a framework for building message-driven microservices. In this post, I use Spring Cloud Stream to connect two microservices through a message broker like RabbitMQ.
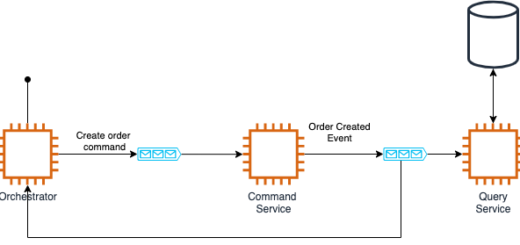
The idea of this project is that we will have one publisher microservice which will expose a REST endpoint. Once the client hits the REST endpoint, the publisher will send a message to a subscriber microservice through a queue.
Basically, this project will cover the following scenario:
1) The client sends a message to the publisher through a REST endpoint
2) The publisher receives the message and then it sends it to a queue in a message broker (Rabbit MQ)
3) The subscriber will receive the message through the queue and process it
Implementation
note: The source code is available in github.
1. Dependencies
I have created both projects using the http://start.spring.io/ website.
The publisher microservice will contain the following dependencies:
– Spring boot
– Spring boot starter web
– Spring cloud starter stream rabbit
– Lombok
While the subscriber microservice has the following dependencies:
– Spring boot
– Spring cloud starter stream rabbit
– Lombok
Bear in mind that in this project I am using RabbitMQ as a message broker but we could use any other message broker like Reddis, ActiveMq or Kafka. Also I like to use Lomkok in my projects because reduces the boilerplate code in Java but we don’t actually need it for the goal of this project.
You could find the producer and subscriber pom.xml files in github.
2. Build the publisher microservice
2.1. Create an interface for the queue
You will need to create an interface with one or more MessageChannels which will represent the queues in the microervice. The queue will need to contain either an @Output annotation for outbound queues or @Input for inbound queues:
public interface OutputChannel {

@Output
MessageChannel output();
}
2.2. Create a REST endpoint
This step is optional, but it will allow us to test the project by sending a message from our browser to the queue. Basically, we will send a message to the endpoint (http://localhsot:8081/sendMessage/), then the resource will get the message and will send it to a queue which the subscriber will be listening.
@RestController
@Slf4j
@RequiredArgsConstructor
public class MessageResource {

 private final OutputChannel channel;

 @RequestMapping(method = RequestMethod.GET, value = "/sendMessage/{message}")
 public String sendMessage(@PathVariable String message) {
   log.info("Receive message {}", message);
   Message msg = MessageBuilder.withPayload(message).build();
   channel.output().send(msg);
  return "Message " + message + " sent to the subscribers";
 }
}
This REST endpoint receives a String and sends it to the queue using the OuputChannel interface declared in the previous step.
2.3. Set the properties
In the properties file we will need to add the server port and the name of the queue:
server.port=8081
queue.name=messageQueue
spring.cloud.stream.bindings.output.destination=${queue.name}
2.4. Create the Application class:
In the application class you will need to use @EnableBinding annotation to get immediate connectivity to a message broker. Note that the EnableBinding annotation includes the interface created in the 2.1 step.
@EnableBinding(OutputChannel.class)
@SpringBootApplication
public class PublisherApplication {

 public static void main(String[] args) {
   SpringApplication.run(PublisherApplication.class, args);
 }
}
3. Build the subscriber microservice
3.1. Create the interface for the input queue
In this case the queue is defined using the @Input annotation because the queue will receive the messages from the publisher.
public interface InputChannel {

 @Input
 SubscribableChannel input();
}
3.2. Create a messageHandler class:
Create a new class that will handle the incoming message. You will need to add the @EnableBingding annotation including the interface from the previous step.
@Slf4j
@EnableBinding(InputChannel.class)
public class MessageHandler {

 @StreamListener(Sink.INPUT)
 public void handle(String message) {
   log.info("message received {}", message);
   System.out.println(message);
 }
}
Please note that we added the @StreamListener annotation to make the handle method receive events for stream processing.
3.3. Set the properties
In the properties file we will need to specify the name of the queue:
queue.name=messageQueue
spring.cloud.stream.bindings.input.destination=${queue.name}
3.4. Create the Subscriber Application class
You will need to create a simple spring boot application class like:
@SpringBootApplication
public class SubscriberApplication {

 public static void main(String[] args) {
   SpringApplication.run(SubscriberApplication.class, args);
 }
}
4. RabbitMQ
If you prefer not to install your own RabbitMQ broker, the project contains a docker-compose.yml file which starts a RabbtMQ container and exposes the 5672 port.
To start the container you just need to go to the project folder and run: “docker-compose up”.
In this project, I am using RabbitMQ but Spring Cloud Streams offers a layer of abstraction so you should be able to use any other messaging broker like Redis or ActiveMQ by just changing the dependency in the pom file.
How to run it
In order to run the project you will need to follow in order the following actions:
- Start RabbitMQ. You can use the docker container from the docker-compose file or run your own instance
- Start the Subscriber application
- Start the publisher application
- Open a browser and send a message to http://localhost:8081/sendMessage like: http://localhost:8081/sendMessage/HelloWorld
Asynchronous communication
I have seen that you some people have asked me about how the asynchronous communication works. Basically, when the publisher sends the message to the queue and it continues doing any job left without waiting for a response from the subscribers.
This is how it works:
- The publisher receives a String message through a REST endpoint (this communication is synchronous)
- The publisher builds a message and sends it to the queue (the communication between the publisher and the subscribers is asynchronous)
- The publisher returns “Message {message} sent to the subscribers” to the REST endpoint, without waiting to get any response from the subscribers.

How it will be asynchronous communication ?? Can you explain ?
Dear author – Could you please explain how would this article publish events asynchronously? Should you rephrase the title of this thread so it doesn’t mislead anyone?
I have just added the explanation about how the asynchronous communication works at the end of the post. Hope it helps.
on point. nice.